Organise project elements by their properties
Topics in this section
- Definition of styles and types
What is a style and what it is its use - Graphic styles
Styles for graphic objects - Building element types
Styles for design elements - Managing styles
Create, edit and manage styles
Definition of Styles and Types
A style is a named, predefined set of information, properties and behaviours that can be applied to multiple graphic objects or architectural elements in a project. Styles can be used for classification and organisation purposes. Think of styles as templates that describe certain properties that are common to all the instance objects that have the same style. The specifications defined by a style are applied to all the occurrences of that class in the project and modifying a style will also modify all the objects in the project that use that style. In brief:
- Style = a template of properties and attributes.
- Instance object = an individual item in the project that can have a style and use the set of properties defined in it.
In relation to styles, an instance object can have:
- No style: this is a custom item and is unique in the project.
- Style: the properties of this object are governed by its style. Changing the style will also update all the objects that use it.
- Modified style: the object uses a style, but one of its properties is different from that defined in the style. Objects with a modified style can be reverted to match their style.
Styles can be created directly in the project, for example using an existing object as prototype, or can be added to the project from a library. When a style is added to the project from a library, it is actually copied into the project so that any modifications to its properties are only applied to that particular project and do not affect other projects.
Though you can create a project without using styles and add only unstyled elements, it is nonetheless a recommended practice to reduce the number of custom elements to the minimum in order to increase the efficiency and scalability of the project.
Styles in HighDesign can be of two classes:
- Graphic Styles, that are applied to 2D drafting objects and define their graphic attributes.
- Building Element Types, applied to architectural elements. Types always include properties and information specific to the class of architectural elements they were created for.
Graphic Styles
A graphic style can store the current settings of layer, pen and fill colour, arrow-heads, line-type, pen-weight and shadow. A graphic style can also include the settings specific to a class of elements, such as, for example, text font and size, or hatch pattern. When you create or edit the style, you decide which attributes should be included and thus applied to the objects.
Graphic Styles are classified as:
- Basic styles. These are generic styles and can be applied to simple drafting objects, including construction objects, lines, poly-lines, rectangles and polygons, arcs, circles and ellipses and curves: existing basic styles can also be loaded by building element types as predefined graphic properties. Properties that are not supported in a class of objects are ignored (e.g. the fill color property is ignored by lines).
- Element-specific styles, that apply only to specific drafting objects with their own tool settings; these styles are connected to the objects they are created for: when you select a specific style, the corresponding tool and method activate. Specific styles also include all the settings specific to their tool: for example, if you create a text style, it stores the current settings of the Text tool, such as font, size, alignment, etc.
Building Element Types
Architectural elements like walls, columns, doors and windows can have predefined sets of information, graphic properties and specific element settings: these templates that apply to new elements or to selected elements are called Building Element Types.
A building element type also stores information such as name, tag and description, optional graphic properties which can be loaded from an existing basic style and the settings (geometry and options) of the current element.
Managing Styles
Use the Styles and Types pane of the Resource Manager to manage saved styles and types: in this panel you can add styles to the project from the HighDesign Library or the User Library; this panel also provides the commands to create, duplicate, edit and delete styles.
The styles loaded in the current project are accessible via the Project Styles panel.
Project Styles panel
Project styles can be quickly created and managed through the Project Styles panel: you can browse and manage the graphic styles and element types of the project, create new ones and remove styles from the project.
This panel marks selected objects or the current tool without a style as “No Style” on the top and lists all available Graphic Styles and Building Element Types of the project below: the current style is highlighted in this list.

The main commands of the panel are grouped as buttons in the bottom of the panel:
- To create a new style push the “Add” button;
- To remove the current style from the project push the “Minus” button;
- To open the Styles and Types pane of the Resource Manager, push the corresponding button. The Add icon on the right of the Graphic Style section title opens the New Graphic Style window, whereas the Add icon on the right of the Building Element Type section title opens the New Building Element Type window.
It is also possible to open a drop down menu by clicking the triangle on the right of the name of a style to get some options of the current style.
The options of the drop down menu are:
- Duplicate Style/Type
- Edit Style/Type…
- Revert to Original Style/Type
- Select All Uses of “current style/type”
- Remove from Project
New Style and New Type windows
The New Style and New Type windows display one or more panes arranged in different sections. The first pane shows the Identity section, which holds the information specific to the selected class of objects, and the Graphic Properties section to set the general properties that are also available in the Properties Bar.
The additional panes of the window can change, depending on the selected class, and present the settings sections specific to the current class of objects.
Create a New Graphic Style
The New Style window can be a single pane window if the selected class of objects does not have its Settings window: in this case the new graphic style is a Basic Style which stores just name and general graphic properties (layer, stroke color, fill color, line type, markers, pen weight, shadow); these properties are optional and it is possible for example to create a graphic style only with name, layer and stroke color. A Basic Style is a general style and can apply to all graphic objects.
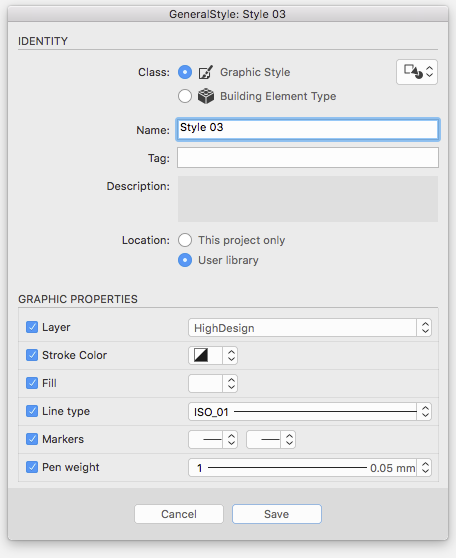
If the selected class of objects includes specific tool settings the New Style window is organized in panes corresponding to the sections of the Settings window of the tool: this graphic style is a Specific Style and stores general graphic properties and all the settings and options belonging to the current class.
In the Identity section of the New Style window it is possible to enter the style name and select the location of the new style:
- This project only: selecting this option the new style is saved only in the current project, not on disk;
- User library: this option saves the style as a file in the User Library folder on disk and in the current project as well.
Once created the new style is added to the list of the Graphic Styles section of the Project Styles panel of the current project. Select it to draw new objects with that style (these objects are called occurrences of the selected style). If the style is a Specific Style, the corresponding tool and method activate. For example, activating a Dimension style will automatically switch the current tool to Dimensions.
To apply a style to one or more objects, select the objects and click the style name on the Project Styles panel.
Create a New Building Element Type
The New Type window displays more options in the Identity section with the fields to enter Type Name, Tag and Description.
Also, the Graphic Properties section is optional and can be activated by clicking the switch near the section title. When this section is active it is possible to load an existing basic style through the Graphic Style menu and extract its graphic properties.
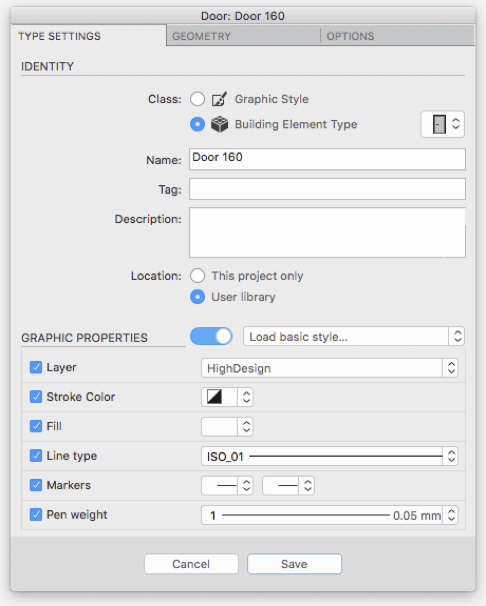
The panes of the New Type window display the settings sections specific of the current class of architectural elements: wall, column, door or window.
New types are added to the list of the Building Element Types section of the Project Styles panel of the current project and can also be saved in the User Library folder.
Edit a Style or Type
Only Project or User Library styles can be modified. As for all other resources, styles and types in the HighDesign library cannot be modified, but only duplicated in the User library or project.
To change the settings of a style, such as its name, graphic properties or specific element settings, select it on the Project Styles panel and choose “Edit Style” or “Edit Type” from the drop-down menu and open the Edit Style or Edit Type window.
This window differs from the New Style/Type window in some details: it is not possible to select the location of the style and all fields and options show the settings of the selected style.
All changes made to a style automatically update all occurrences of that style in the project. If an occurrence of a style is modified, when selected it is marked as modified in the Project Styles panel. It is not possible to update or create a Style or Type by selection.
Revert a Style
When an instance object has been modified by changing one of its graphic properties or settings, you can revert it to its original style by choosing “Revert to Original Style” from the drop-down menu of the Project Styles panel.
Find all uses of a Style or Type
In the Project Styles panel open the drop-down menu of the style or type and choose “Select All Uses of [style/type name]”. All the instances of that style on the current sheet are selected.
Remove a Style or Type from the Project
Select the style or type on the Project Styles panel and click the “Remove from Project” button (–), or choose “Delete Style/Type” from the drop-down menu.
If there are any occurrences of that style in the project, a dialog lets you choose the “No Style” option or a new compatible style to replace the one you are removing. The objects whose style is replaced are updated to match the new style.