Sharing your project
Topics in this section
- Import DWG/DXF drawings
Open and convert drawings in the DWG or DXF file formats. - Import DWG/DXF blocks
Convert collections of blocks into HighDesign symbols. - Export your project
Save your project in another file format.
Import DWG/DXF Drawings
Select File ▸ Import ▸ Single DXF/DWG file. Before opening a DXF/DWG file a dialog lets you set the basic import settings:
- Drawing units to be used to convert DXF/DWG elements; most DXF/DWG versions do not include a measurement unit;
- Destination scale of the drawing;
- When the “Use file drawings units” option is active, HighDesign tries to set the drawing units as found in the file. If no drawing unit is found this option has no effect;
- Options to set the background color to black or to add a prefix to layers;
HighDesign SE and Pro import DWG/DXF documents with both Layouts and Model data: when opening the document, the drawing, or Model, is located on the sheet named “Model”. In HighDesign SE, layout sheets are imported as drafting sheets with a defined paper format; in HighDesign Pro, the Layout objects are imported into layout sheets.
HighDesign LT only imports the Model space. Layouts are ignored.
Insert a DWG/DXF drawing (SE & Pro)
In HighDesign SE and Pro, use the Project ▸ Insert ▸ DWG/DXF drawing menu item to insert a DWG/DXF drawing into the current project without creating a new document. This command will add a new drafting sheet with the Model space from the specified drawing.
Import DWG/DXF Blocks (Pro)
Use the “Import DWG/DXF Blocks” tool to convert a folder of DXF/DWG blocks or drawings to HighDesign-native symbols. Converting a symbol library is a two-step process, all performed in a single window.
Choose File ▸ Import ▸ Import DWG/DXF Blocks…; the following window opens:
- Conversion options – convert blocks/drawings within one folder or blocks within one DWG/DXF file. Push the Choose button
- When the import process is complete, you can use the table to review and edit the imported symbols.
- Preview of the symbol.
- Click the Convert button to save the HighDesign symbols into your current Library folder.
The list of symbols can be reordered by dragging the rows.
The first step consists of selecting the folder on your disk and importing all the readable drawings contained in it. Supported formats are all DXF versions from R10 to 2020 and all DWG versions from R9 to 2020 (DWG support only available in HighDesign Standard and Pro).
Push the Import button to choose the folder. If the selected folder contains readable files, the standard DXF/DWG Import dialog opens allowing you to set the scale and drawing unit options.
With the second step you can set the options and complete the conversion to HighDesign symbols. The table displays name, scale, width, height and the preview of each symbol, letting you modify the attributes of the symbol before it is saved.
Extend the default Symbol Library
It is possible to extend your Symbols library by creating new custom symbols or by adding external libraries: the “Add Symbol Library” command on the File menu lets you select a folder of HighDesign symbols and copy them to the desired folder in the User Library folder.
Export Your Project
Your project can be exported to many graphic formats. Select File ▸ Export As and choose the destination file format:
- DWG file format from version R12 to 2018-2020 (.dwg).
- DXF file format from version R12 to 2018-2020 (.dxf).
- DXB (.dxb) versions R12-2018-2020.
- Vector PDF (.pdf) – (Pro only).
- Image file: PNG, JPEG, TIFF, BMP, GIF, WebP, TGA, HDR.
- TIFF (.tif).
- JPEG (.jpg). When you export a drawing to JPEG, a dialog lets you set the compression quality and JPEG specific attributes. On the right half of this dialog, a preview shows the new file and the original image.
- PNG (.png). PNG supports high DPI and provides the option to export with the Alpha channel. Alpha channels are 8-bit masks that make the final image transparent. In HighDesign, a PNG with alpha channel is a transparent image with no background.
- GIF (.gif).
- BMP (Windows Bitmap).
The Export as DWG/DXF dialog provides the following options:
- Format version via a pop-up menu. Also available in HighDesign Standard;
- List of sheets of the HighDesign project and ability to select Drafting Sheets, Details and Layouts to export;
- Option to export all selected sheets as a single DWG/DXF document;
- Option to export each selected sheet as a separate document (all documents are collected in one folder).
Export as Image File
The project can be exported as an image file for publication, sharing or review. The exported image contains the visible elements of the project: layers and sheets will be exported as they are displayed on screen or ignored if hidden.
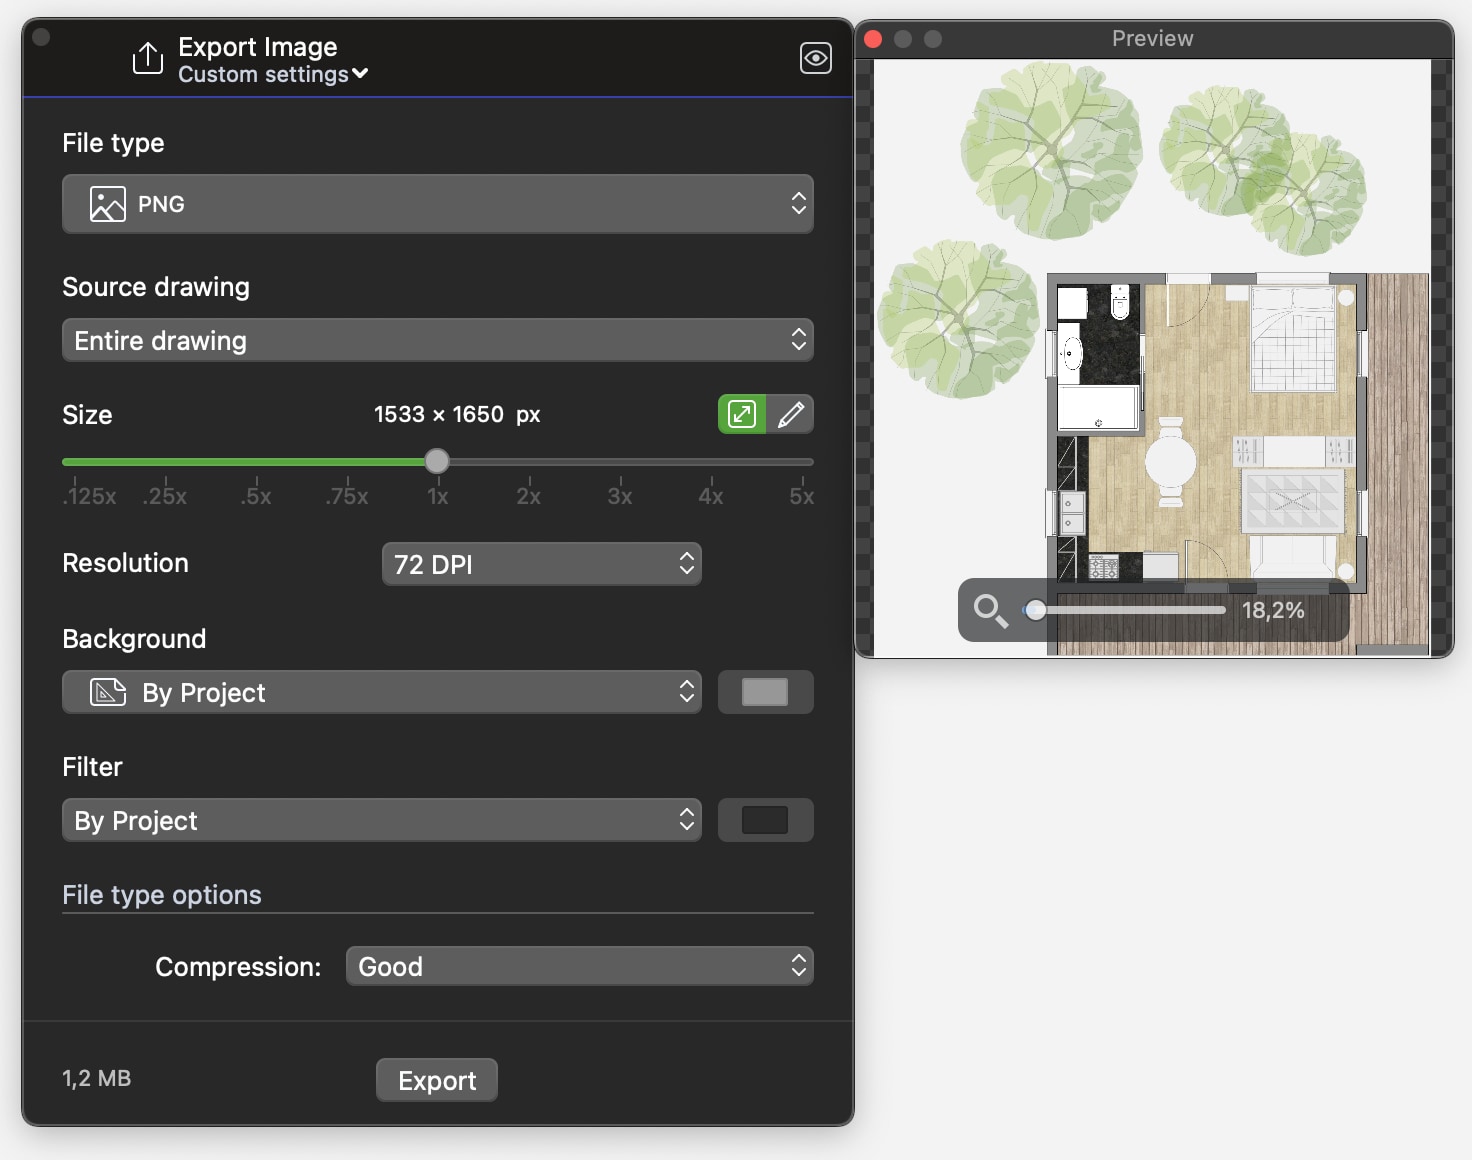
Choose File ▸ Export ▸ Image File… or press the Export button on the top toolbar to open the Export Image window. The Export Image window is organized into a number of sections from top to bottom:
- File type: opens a menu with the available file formats. The list contains PNG, JPEG, TIFF, BMP, GIF, WebP, Targa, and HDR. Each file format has its strengths and options that make it more or less suitable than the others to store the image data. Depending on the selected format, some options such as transparent background or compressione may not be available.
- Source drawing: select the drawing to export choosing between the entire drawing or just the current selection.
- Size: this section lets you define the size of the exported image. Use the slider to scale the image up or down relatively to the size of the source drawing. The label above the slider shows the calculated size (width x height) in the current unit. You can change the measurement unit by clicking the unit symbol.
- NOTE: A size expressed in Pixels (px) is the size of the actual pixel data (width x height) that is going to be written in the file, regardless of the image resolution. Any other unit expresses the size at the intended resolution. In graphics software, this difference is usually referred to as “screen size” vs “print size”.
- It is also possible to enter the desired size of the image manually: click the Pencil icon to enter the values in the current unit.
- Resolution: choose the desired resolution of the image. Resolutions above 144 DPI are usually intended for printing.
- Background: select the type of background of the image from a range of choices. To export an image without background (commonly also referred to as “with alpha channel”), choose Transparent.
- Filter: select the color filter to be applied to the drawing objects.
- File type options: this section shows the available options associated with the selected file type. If the selected file type has no options, this section is hidden.
Using Presets
The Export Image window offers the ability to load and save presets that store a collection of settings. Use the pop-up menu on the title of the window to select a preset or save the current settings as a new preset.
Preview
It is possible to view how the final image will look like by clicking the Preview button on the upper-right corner of the window. This floating window shows how the actual exported image looks, so it may show artefacts or altered colors depending on the file type and the compression level. The approximate file size in bytes or Mega bytes is visible in the lower-left corner of the Export Image window.