Creating layouts with viewports and title blocks
Topics in this section
- Layouts
Present your drawings in layouts. - Title Blocks
Display firm, project, sheet and drawing information on layouts. - Viewports
Creating views of your drawings for layouts. - Publish to PDF
Exporting your project as a PDF book.
Layouts (Pro)
Use layout sheets to display and arrange scaled views of your project on a standard-size sheet. Layouts can show a pre-made title block with global information about your firm and the current project and sheet-specific information.

These named pages are intended for publishing and output purposes, therefore layouts have some characteristics that are unique and specific to this environment:
- Layouts are opaque sheets
- The scale of the layout is always 1:1 real scale
- Layouts have a paper size, defined as default by the Paper Format settings of the project
- You can choose to show the current print margins;Layouts always have a sheet ID
- You can add a Title Block by choosing from the existing ones or you can create a new one
- There are the options to show the frame border and the centering marks
- You can set the nominal scale of the views
- You can enter text information to the current layout to be shown on the title block
- You can create one or more viewports to show and arrange selected views of the project at the desired scale
- The available set of drawing tools is limited to sketching and documentation tools
Managing Layouts
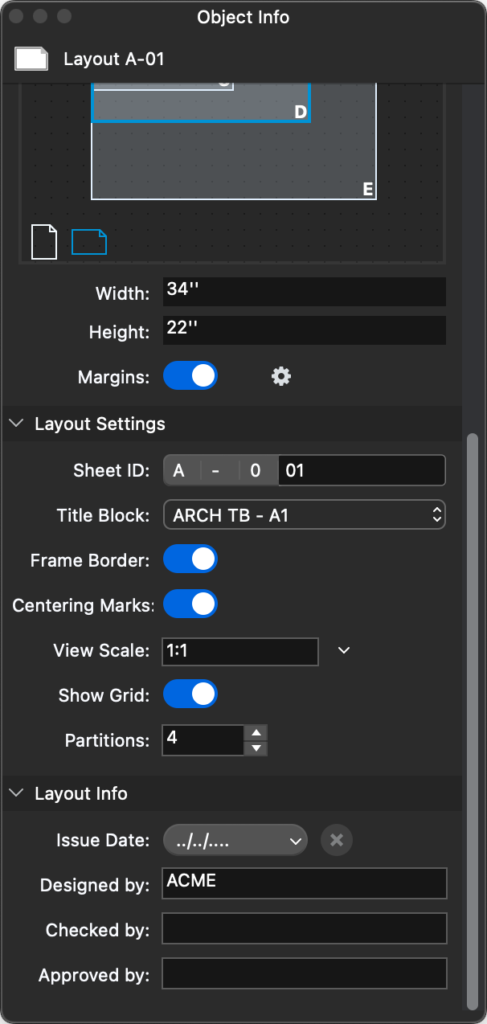
As for the other sheets of the project, use the Project Browser panel to create and access the Layouts. The Object Info panel shows all the options, settings and information of the current layout and is divided into four sections:
- Sheet, which displays name and generic sheet information like scale and units;
- Paper Size, to change the size of the current Layout only;
- Layout Settings, to set sheet ID, title block and nominal View Scale;
- Layout Info, to set the issue date and enter text information.
Title Blocks (Pro)
A title block is an element of a layout that contains information about the design firm, the client and site location, the project and the sheet. It usually has a border and is organized in sections with different types of data and is usually found on the bottom or lower right-hand corner of any layout sheet.
A title block is a sub-class of the Symbol and inherits all the properties of symbols. The information displayed on a title block can be entered as attributes that are defined when the title block is designed. In addition to attributes, title blocks can contain text labels and blocks with custom or automatic content.
Creating a new Title Block
You can create a new Title Block through the Title Block menu on the Object Info panel of the current Layout or through the menu Project ▸ Title Block. Title blocks are designed in a specific workspace that provides the graphic tools required to draw the title block and a panel to set the title block name and manage the text attributes.
- On a layout sheet, choose Project ▸ Title Block ▸ New Title Block.
- The first dialog asks you to choose a reference paper size for the new title block. Although a smaller title block can be used on larger paper sizes, it is best to select the ideal paper size this title block is intended for.

- The title block panel lets you enter a name and the text attributes. Attributes can be of two types: constant and custom.
- To design the title block and its sections, use the drawing tools available on the Toolbox.

Title Block Attributes
Attributes are text values with dynamic content. The pre-defined attributes can be selected through the menu on the Title Block panel. These attributes are separate as:
- Layout attributes which correspond to the information entered in the Layout Settings and Info sections of the Object Info panel of the current Layout;
- Project attributes corresponding to the information entered in the Project Information panel of the Project Settings window.
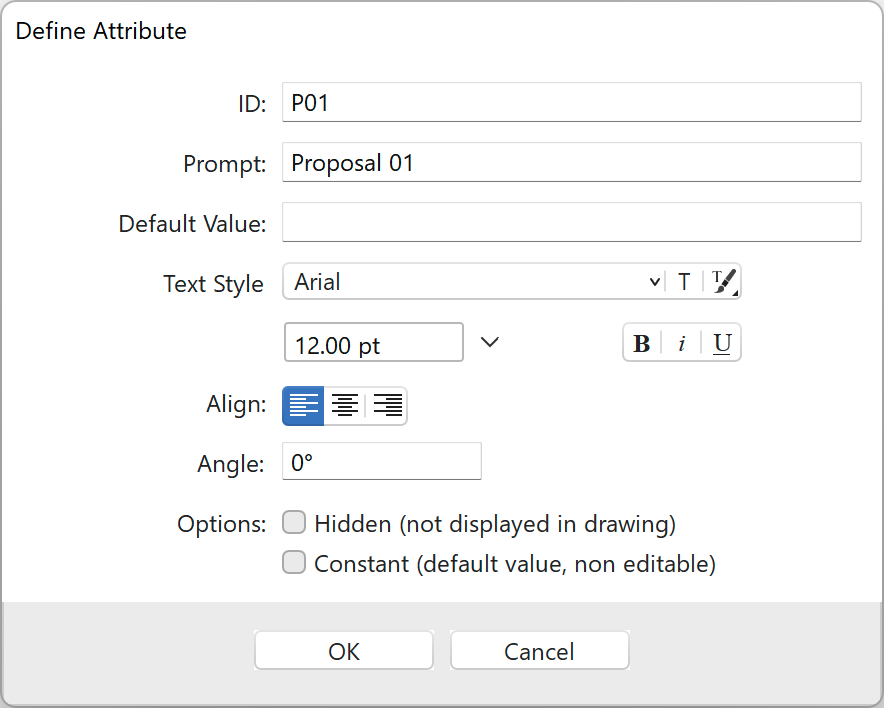
Attributes of the title block can also be custom attributes and once you click the Add button, the Define Attribute window opens displaying the options and input fields.
Inserting a Title Block Attribute
To insert an attribute on the title block, click on the desired location. Attributes are special text objects and can be moved or aligned. You can modify the text properties through the Text settings panel (double-click the Text tool on the toolbox to open it). To change its Attribute properties, press the Edit Attribute button of the Title Block panel.
The Save button creates a new Title Block on the User Library which is immediately available for use in the current layout and in new projects.
A Title Block can be inserted even in a layout of different size from the one it was created for, depending on its bounds. When you select a title block it is automatically inserted at its default position on the layout as a preset: anyway, you can move it to any other position as a drawing object.
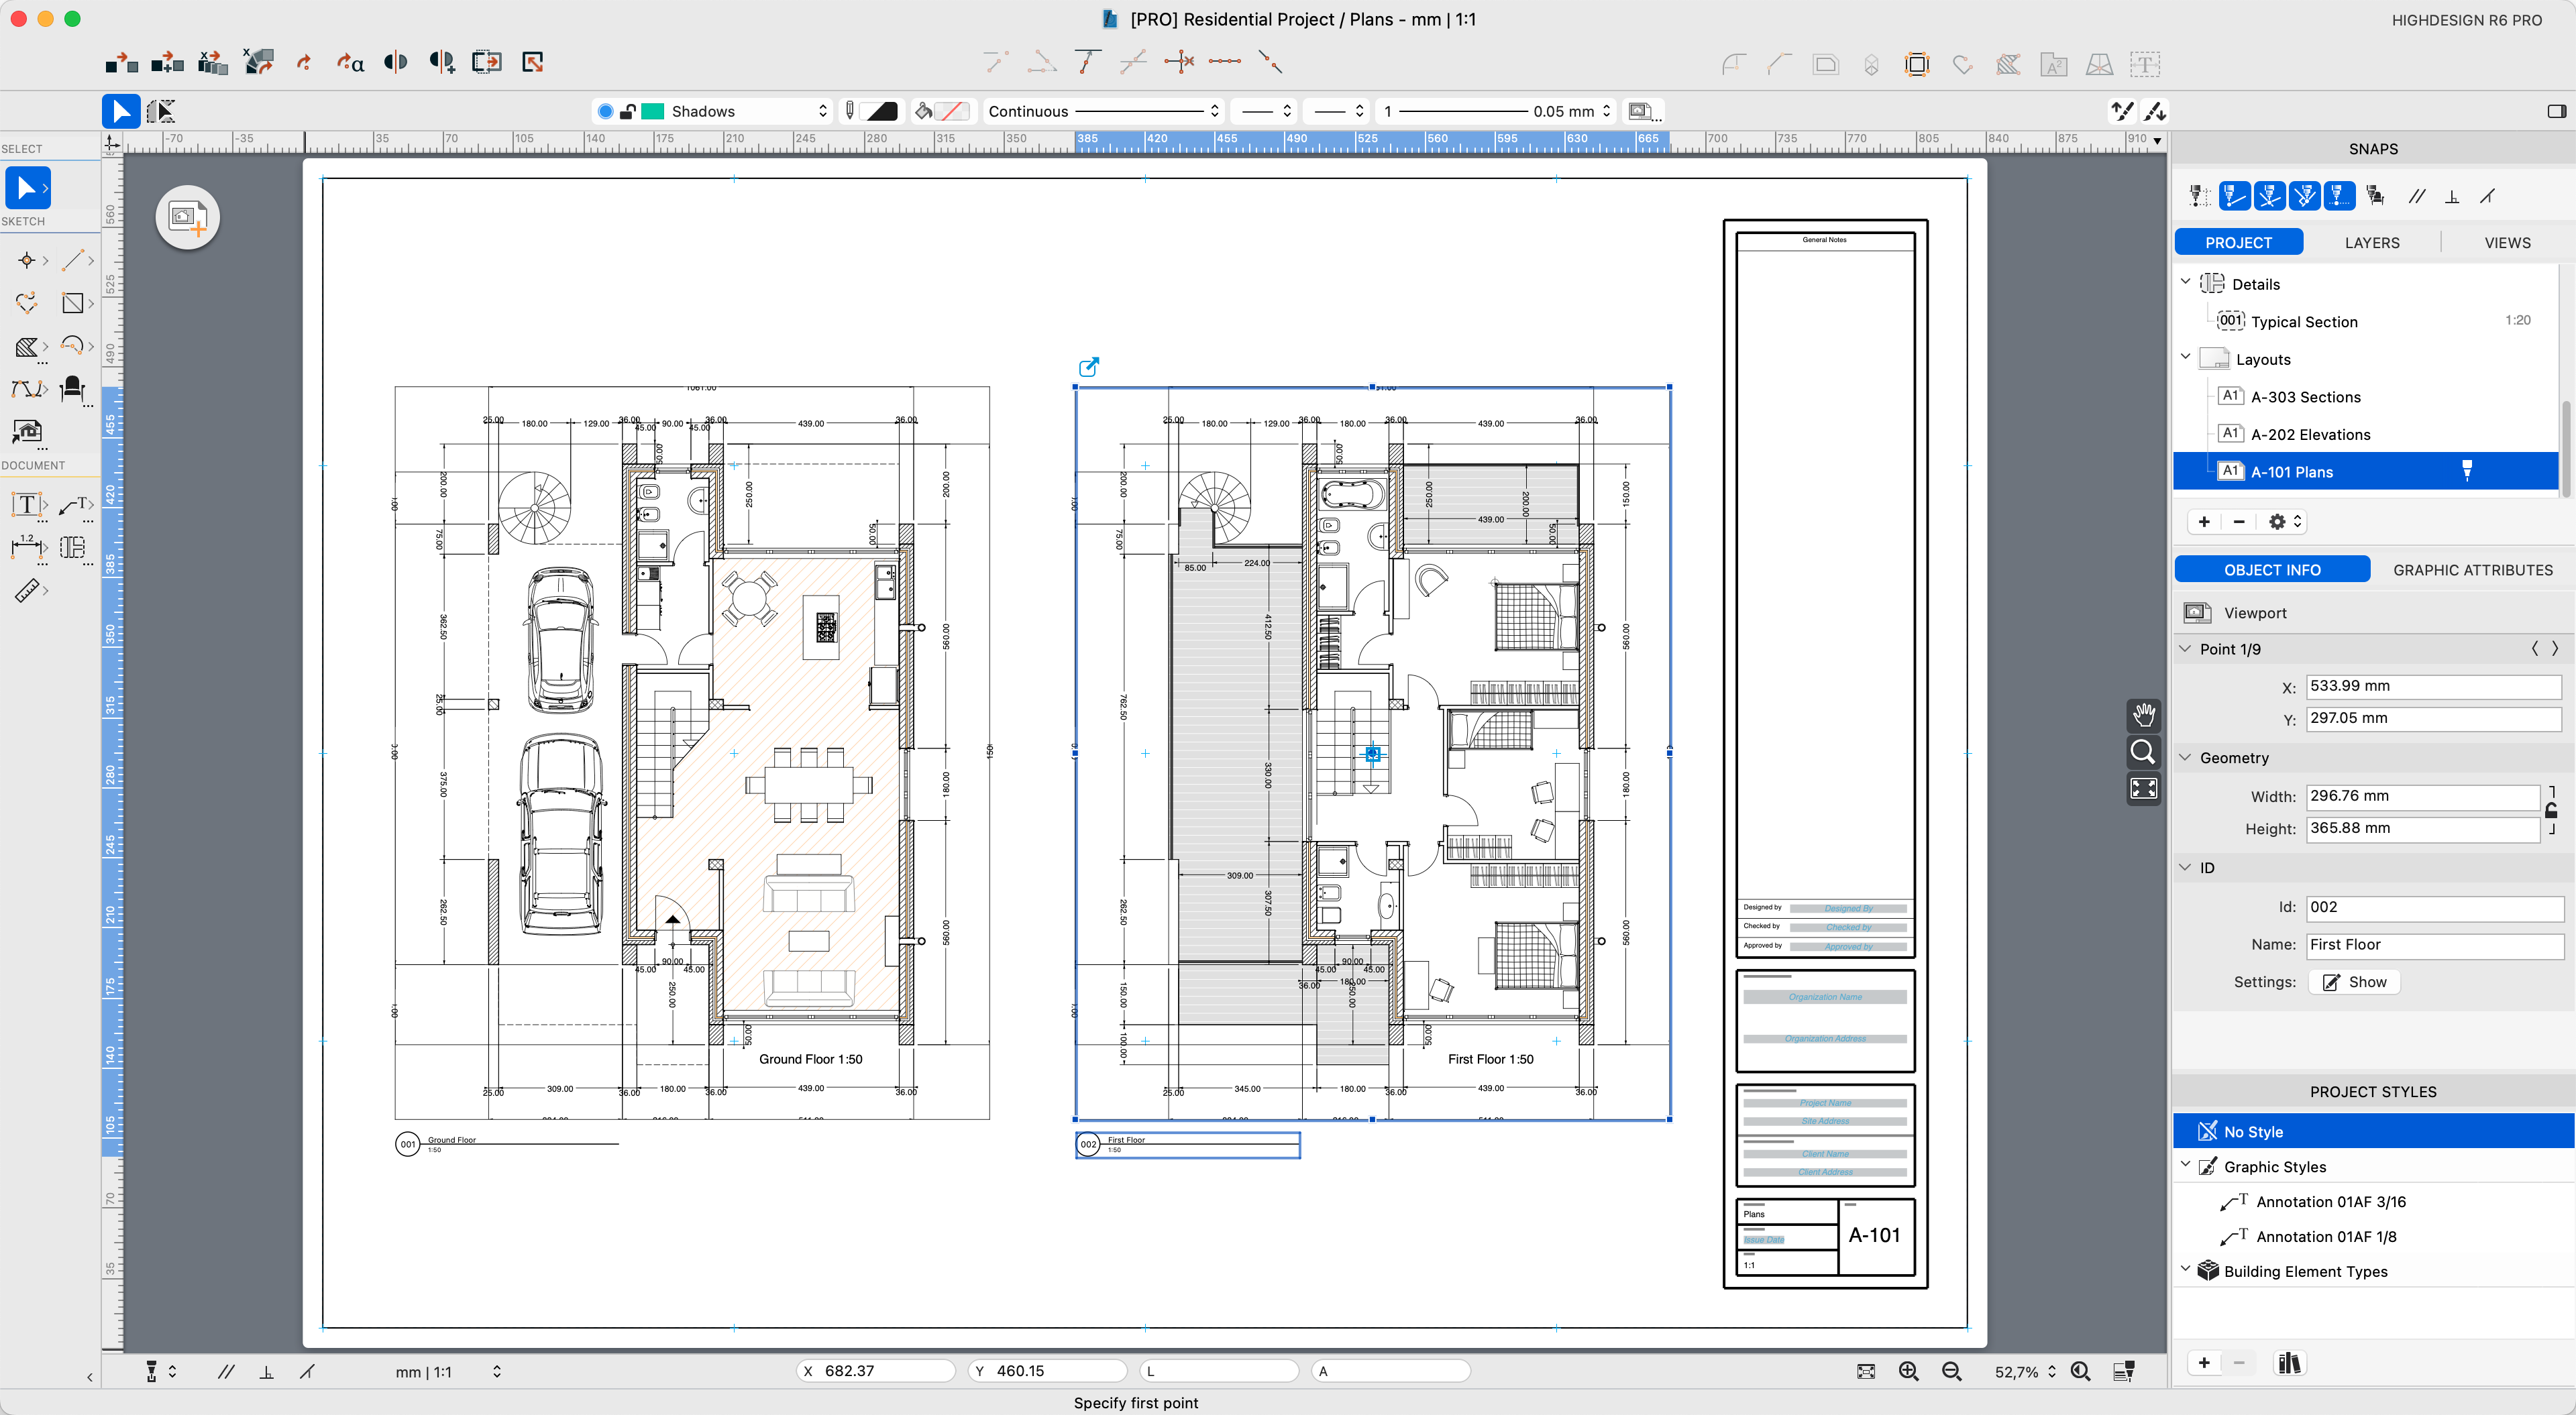
Viewports (Pro)
Viewports are elements that display scaled views of the project. Think of them as windows that show a portion or the entire view of a drafting or detail sheet, and provide basic information about the views. When you use layouts and viewports, the drafting sheets and the other design sheets contain your project, whereas layouts and viewports show a clean view of the project suitable for presentation and revision.
- It is also possible to use only the drafting sheets to present your project, since drafting sheets can have their own drawing scale and paper size. This workflow offers of the advantage of directness because what you see on the drafting sheet is exactly what you will see on the printed sheet, but it lacks the flexibility and scalability of layouts and viewports.
Viewports exist only on layout sheet. On each layout you can place one or more viewports that reference different drafting sheets, parts of the same sheet or event the same view at different scales. The view displayed in a viewport can use a custom rotation angle, a filter that changes the way borders and fills are represented and a transparent color overlay.
To create a new Viewport use the button on the top-left corner of the Layout canvas or select the menu command Project ‣ Create Viewport. Viewports exist within Layouts only.
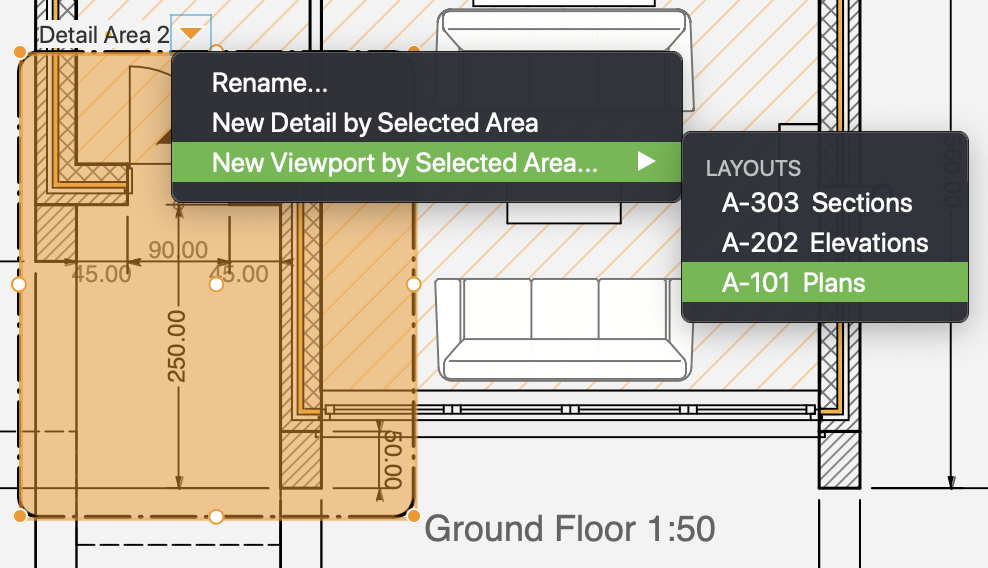
The Viewport tool lets you create a viewport directly by a detail area too: select the source sheet and then choose a detail area. Position and size of the viewport will be taken from the source area and updated live if the detail area is modified.
Alternatively, viewports can be created directly from a detail area. On a drafting sheet, select or create a detail area around the part of the drawing that you want to show in the viewport. Click the pop-up arrow near the detail area name, go to New Viewport by Selected Area and choose the layout on which to create the viewport.
Set up the Viewport
The Viewport dialog shows two panes with the Drawing and Title Mark options. The Drawing pane provides the options of viewport window and selected view:
- Source drawing (drafting sheets, detail areas or details of the project);
- Scale of the view, which can be different from the original scale of the selected sheet;
- Angle of the view, by moving the angular slider or by entering the value in the field;
- Size of the Viewport – automatic, by the extents of the source drawing, or custom, by drawing the rectangle of the viewport;
- Filter applied to the view (by project, by layer, black and white, grayscale, etc.).

On the Title Mark pane you can set the position of the title mark within the viewport, the name of the view, the option to show scale and other graphic options.
The available options are:
- Show/Hide Title Mark;
- Position of Title Mark within the viewport on the upper or bottom edge;
- Title of the Viewport;
- Font options – font menu, button to open the Fonts window, button to select existing styles, font size and units menu, default text styles;
- Show/Hide Scale of the view;
- Show/Hide Extension Lines of the Title Mark;
- Extension Line options.

Insert and Manage Viewports
You can insert the viewport on the layout as an object of predefined size or you can draw the viewport as a rectangle by its diagonal, depending on the selected size option. The center of a new viewport corresponds to the center of the selected source drawing: if you wish to display a specific area of the drawing, select the viewport, click inside and move the source drawing within the viewport till the desired area matches the center of the rectangle.
A viewport can be moved within the layout as a drawing object with its properties: frame and background can have their color and line style.
Viewports created as rectangles can be resized by their selection handles, either vertices or midpoints, or through the Object Info fields of Viewport Geometry. Viewports created by the extents of the source drawing cannot be resized.
The information displayed in the title mark of the viewport can be quickly set and edited through the ID section of the Object Info panel which provides the Id and Name fields and the button to open the Viewport settings dialog.
For a quick access to the source sheet of the selected viewport, click the link icon on the upper left corner of the viewport.
Publish to PDF (Pro)
With this function available on the File menu it is possible to create single page or multiple pages vector PDF documents which can be edited with other applications and printed with large format printers and plotters.

The options available in the Publish to PDF window are:
- Check the Include Construction objects option if you want the PDF to include points and construction lines.
- Document pages: “Single Page” creates a one-page PDF document; “Multiple Pages” creates as many pages as the visible sheets.
- Include copyright info: this option adds information about the project from the Info pane of the Project Settings window.
- Publish menu brings the following options:
- Current View to export the project as it is currently visible on screen;
- Custom to select the desired sheets to export;
- All Layouts to create a multiple page PDF document with all the layouts of the project;
- List of the available Project Views to export the selected one.
- List of all Sheets, Details and Layouts of the current project: select the sheets to include in the PDF document for custom publishing.
- Page Size menu. Available options are:
- Fit Drawing Extents: page sizes are calculated on the extents of the drawings.
- Available Sheet Size: this sub-menu lists the sheet sizes of project if already set; all sheets get the size from the selected one.
- ISO, ANSI, US ARCH standard sizes sub-menu.
- Orientation of the selected page.
- Option to scale the drawing to fit the selected page.
- Option to apply graphic filters to the PDF.