Organizing and extending layers, line types, hatches and other resources.
Topics in this section
- The Resource Manager
Add resources to the project and organize the libraries. - Layers
Manage the project layers. - Line types
Add and manage dashed and special line types. - Hatch types, patterns and textures
Linear hatches with multiple rules, vector patterns and bitmap textures. - Color palettes
Manage the color palettes. - Styles and Types (Pro)
Organize and create graphic styles and building element types.
The Resource Manager
A project resource is a loadable item that can be used in the project as is or in a modified version. Layer sets, line types, hatches, styles are all project resources. HighDesign includes standard libraries of resources and, in the SE and Pro editions, offers the ability to create new resources and store them in custom libraries.
The Resource Manager window allows you to load line types, hatches, styles and other resources into your project. In HighDesign SE and Pro, the Resource Manager also allows you to organize your libraries of re-usable resources and create new items. Select Project ▸ Resource Manager to open it.
A resource item is similar to a template: when you load a resource into the current project, HighDesign makes a copy of that resource that can be modified locally in that specific project without affecting the other resources loaded in other projects.
Editing the original resource file is also possible for custom resources, and a project can be updated to use a new version of a resource by reloading it. Default items that are located in the HighDesign library cannot be edited, but they can be duplicated and edited as custom items.
NOTE In HighDesign, resources like line-types, hatch types, and symbols can be stored in three libraries: the HighDesign Library, which is internal and cannot be edited; the User Library, which extends the internal library with all the custom resources created by you; the Project Library, which includes the items loaded in the project and can include any imported resources that are available in the current project only.
HighDesign Lt does not support custom libraries: new resources are automatically created inside the current project.
Layers
Use the Layers pane to create, delete and organize the layers of your project.
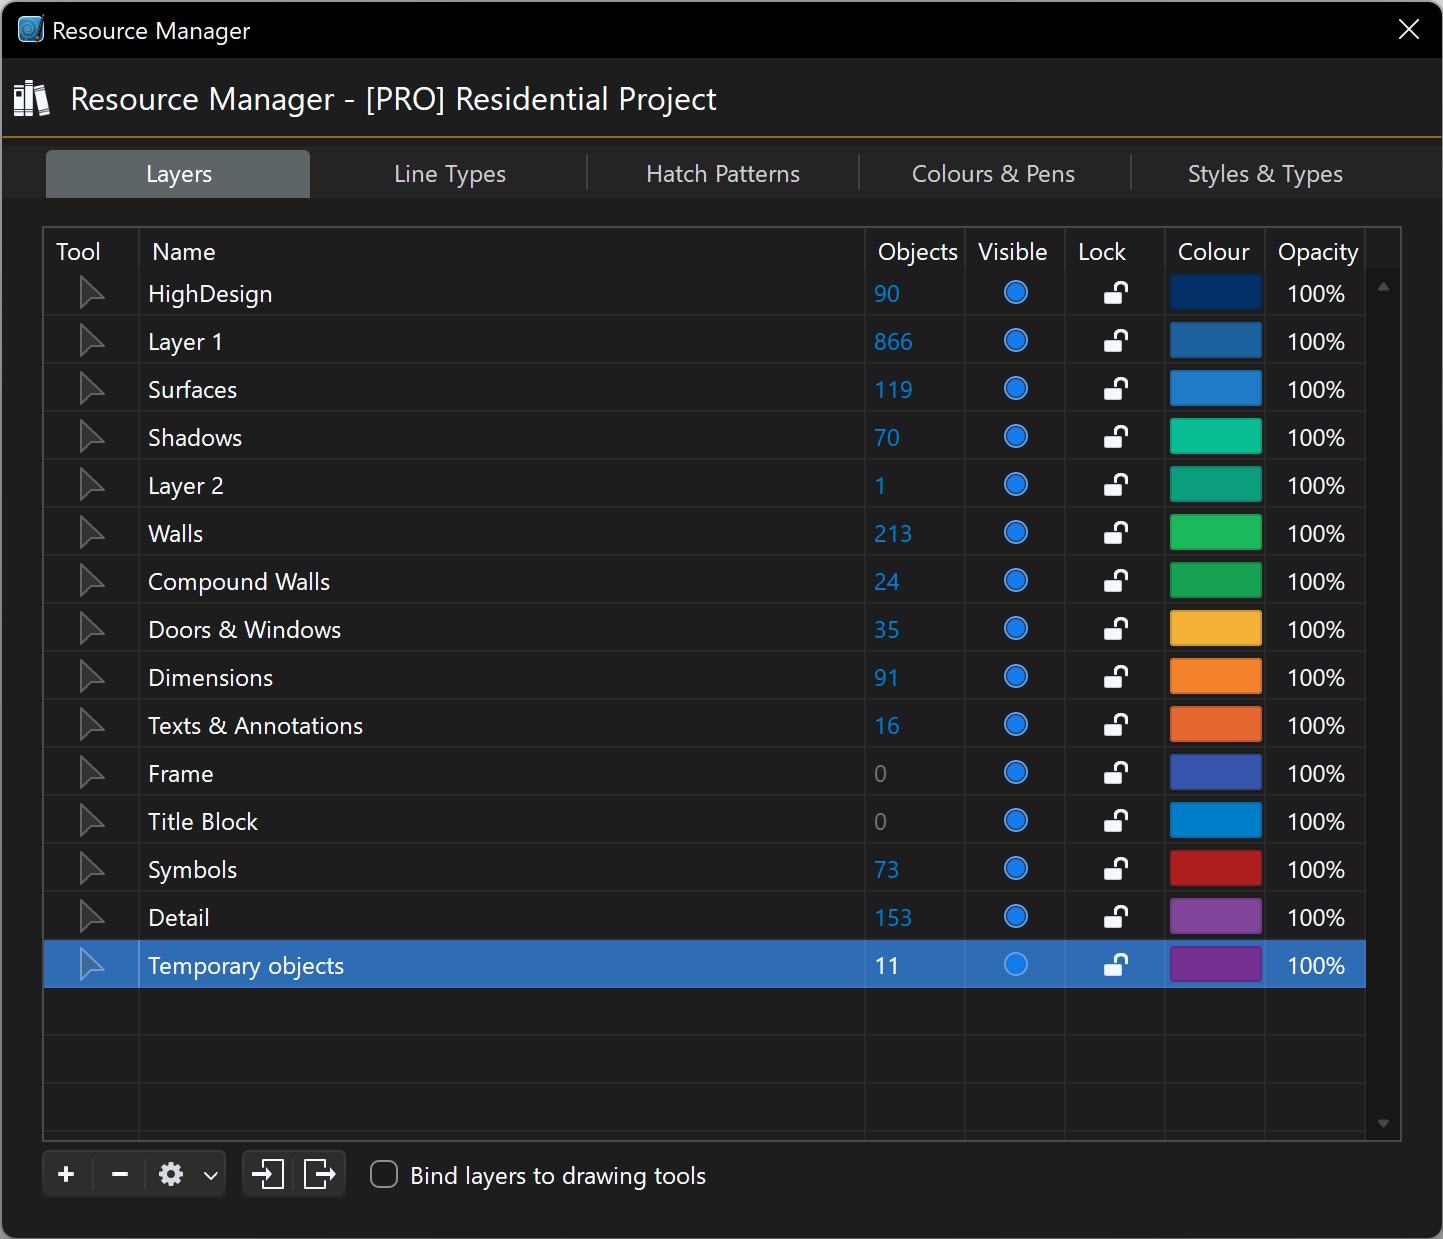
The options available in the Layers pane are:
A. Default tool B. Layer name C. Number of objects on each layer D. Visibility E. Lock F. Color G. Layer opacity
The buttons on the lower side of the window serve the following functions:
- new layer
- delete layer
- action menu with selection options
- Import and export layer set
- Bind Layers to drawing tools.
- Almost all operations on layers can be performed via the main layers table, where each row displays all the layer attributes.
- The second and the third columns display the layer name and the number of items on each layer: double click to change the name. The last four columns display the layer attributes: visible / invisible, locked / unlocked, default color and opacity.
- To reorder a row, just drag it to the new position: note that reordering has no visual effect on the display order of layers, but it allows you to keep them organized in a way that’s most convenient to you. To create or delete a layer use the buttons below the table; you can delete any layer anytime, but at least one layer must always be present.
- Both new layers and those imported from other documents are automatically set as document layers only, meaning that they only exist within the owner project.
Binding Layers to Drawing Tools
Layers can be associated to certain drawing tools with the “Bind layers to drawing tools” checkbox. When this option is active, each drawing tool is linked to a layer: when you select a tool, its layer automatically becomes active, thus simplifying the process of organizing a project.
For instance, in an architectural project freehand lines might only be used to design the landscape: linking the “Freehand” tool to a “Terrain” layer is a convenient way of keeping the project organized without having to change layer each time you change tool.
The first column of the Layers table shows the drawing tool connected with the layer if the Bind Layers to Drawing Tools option is selected. Click to choose the tool or method to bind.
Line Types
This pane lists the line types of the project. By default a new project comes with only few line types available, continuous and various dashed lines. Use the Line-types Manager to add more lines to the project, create new types, edit custom lines, and organize the resources.
The options in this pane include:
- Loading a saved line-type into the project or removing a type from the project
- Creating a new line type
- Duplicating and editing line types
- Deleting a line type from the project
- Reordering the project line-types
The main table lists all the line types that are currently loaded in the project. A loaded item is available for use in the project and does not necessarily mean that it is actually used by some object.
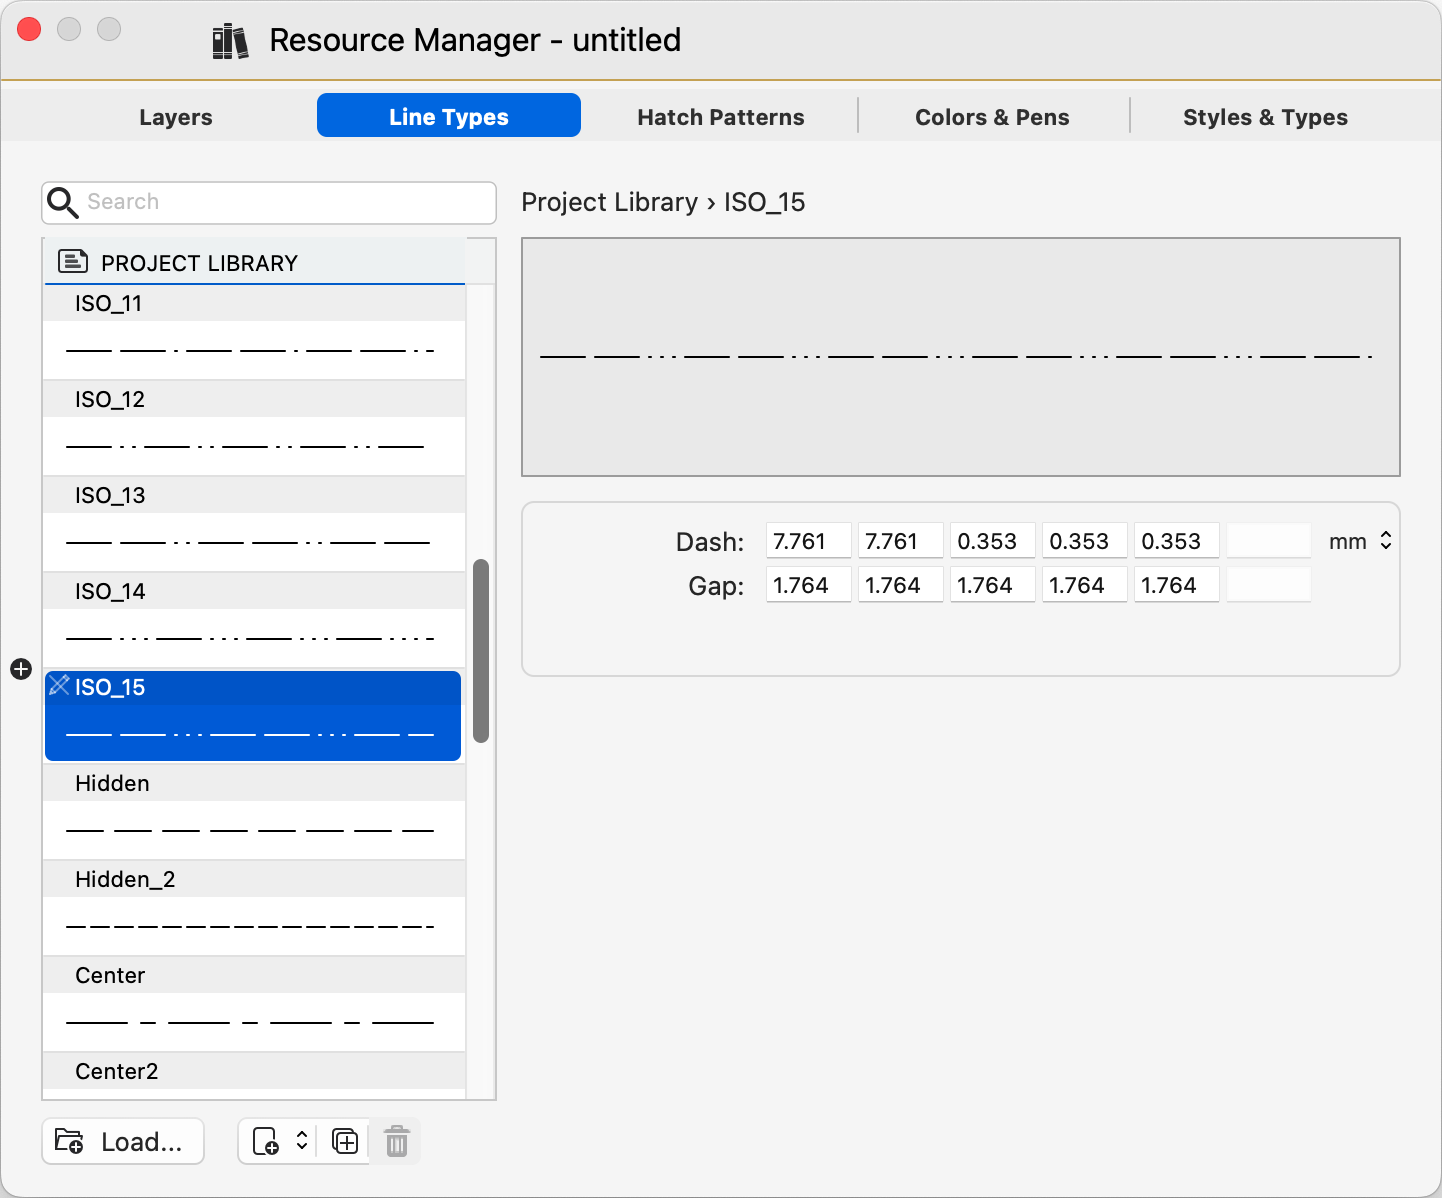
Inspecting a resource
Select an item in the Project library to see its preview and inspect its values. Depending on the selected item’s location, it can be edited or deleted if it is a custom item, or duplicated.
You can search for a specific line type by entering its name in the search field.
The list order of project line types can be rearranged by dragging a line type to its new position.
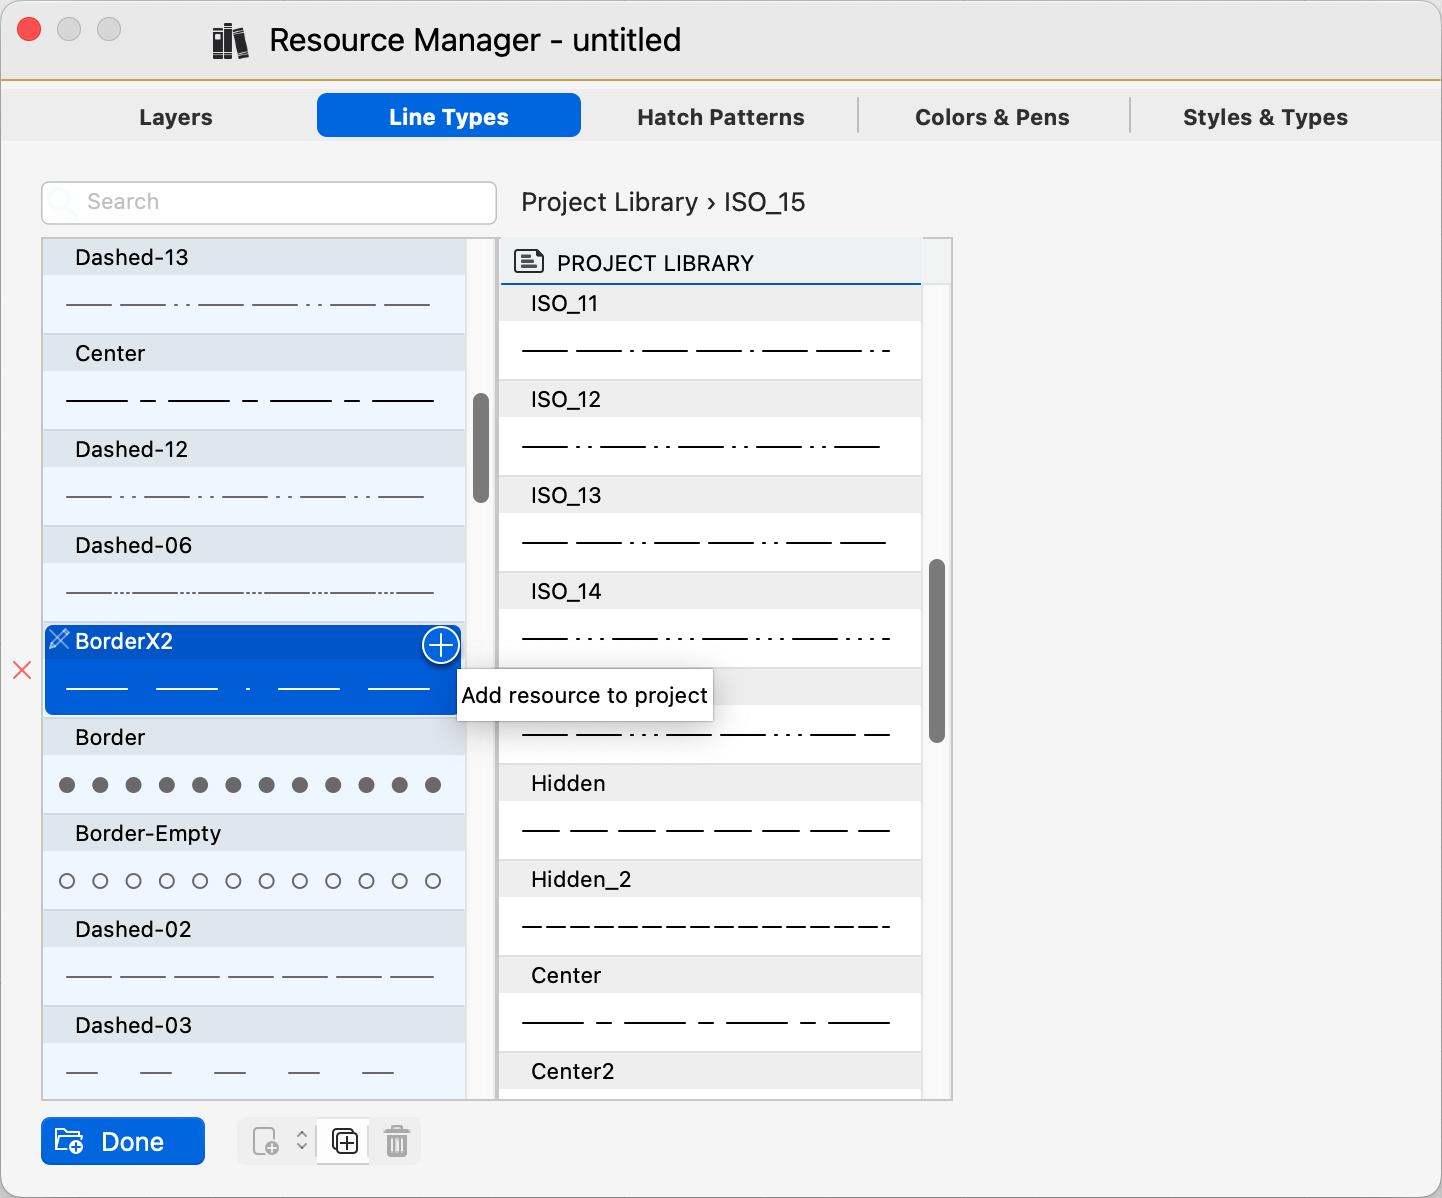
Loading a resource from a library
Press the Load button or click the + button to the left of the Project list to reveal the libraries. Select the item to load and push the plus button or drag the item to the Project list. The item is loaded into the project and immediately available for use.
Duplicating a line type
You can duplicate any line type. To duplicate, select a line type and either push the Duplicate button on the bottom side of the window or the pop-up duplicate button on the selected selected line type’s cell when available.
The duplicated line type is automatically opened for editing so you can modify its name and values directly.
Create a new line type
- Click the “New line” button.
- Select a base type from the Line type pop-up menu.
There are two main families of line types:
Dashed lines
Dashed lines are defined by a repeated pattern of dashes and gaps. The values of the pattern can be defined in any of the base linear units: millimeters, inches and pixels/points.
A dash pattern can have up to six dash-gap pairs. A value of 0.0 means that the item will be rendered as a dot.
Special lines
Special lines can be made of different shapes and patterns and are defined by frequency and intensity values. Frequency controls the extent or the distance between the repetitions; intensity controls the size of the item.
Special lines can be created from pre-defined types like insulation, zigzag, vertical dash, etc.
When the line type is defined, push the Save button to save it. The line type will be saved as a loadable resource file if the chosen location is the user library, or as an internal resource if saved in the current project.
Edit a line type
Custom and project line types can be edited by pushing the Edit button on the selected item’s cell. It is possible to change any of the parameter values and the name, but not its location.
Delete a line type
Only custom and project line types can be deleted. Select the line type and push the Delete button. Objects that use that type will be reverted to Continuous line.
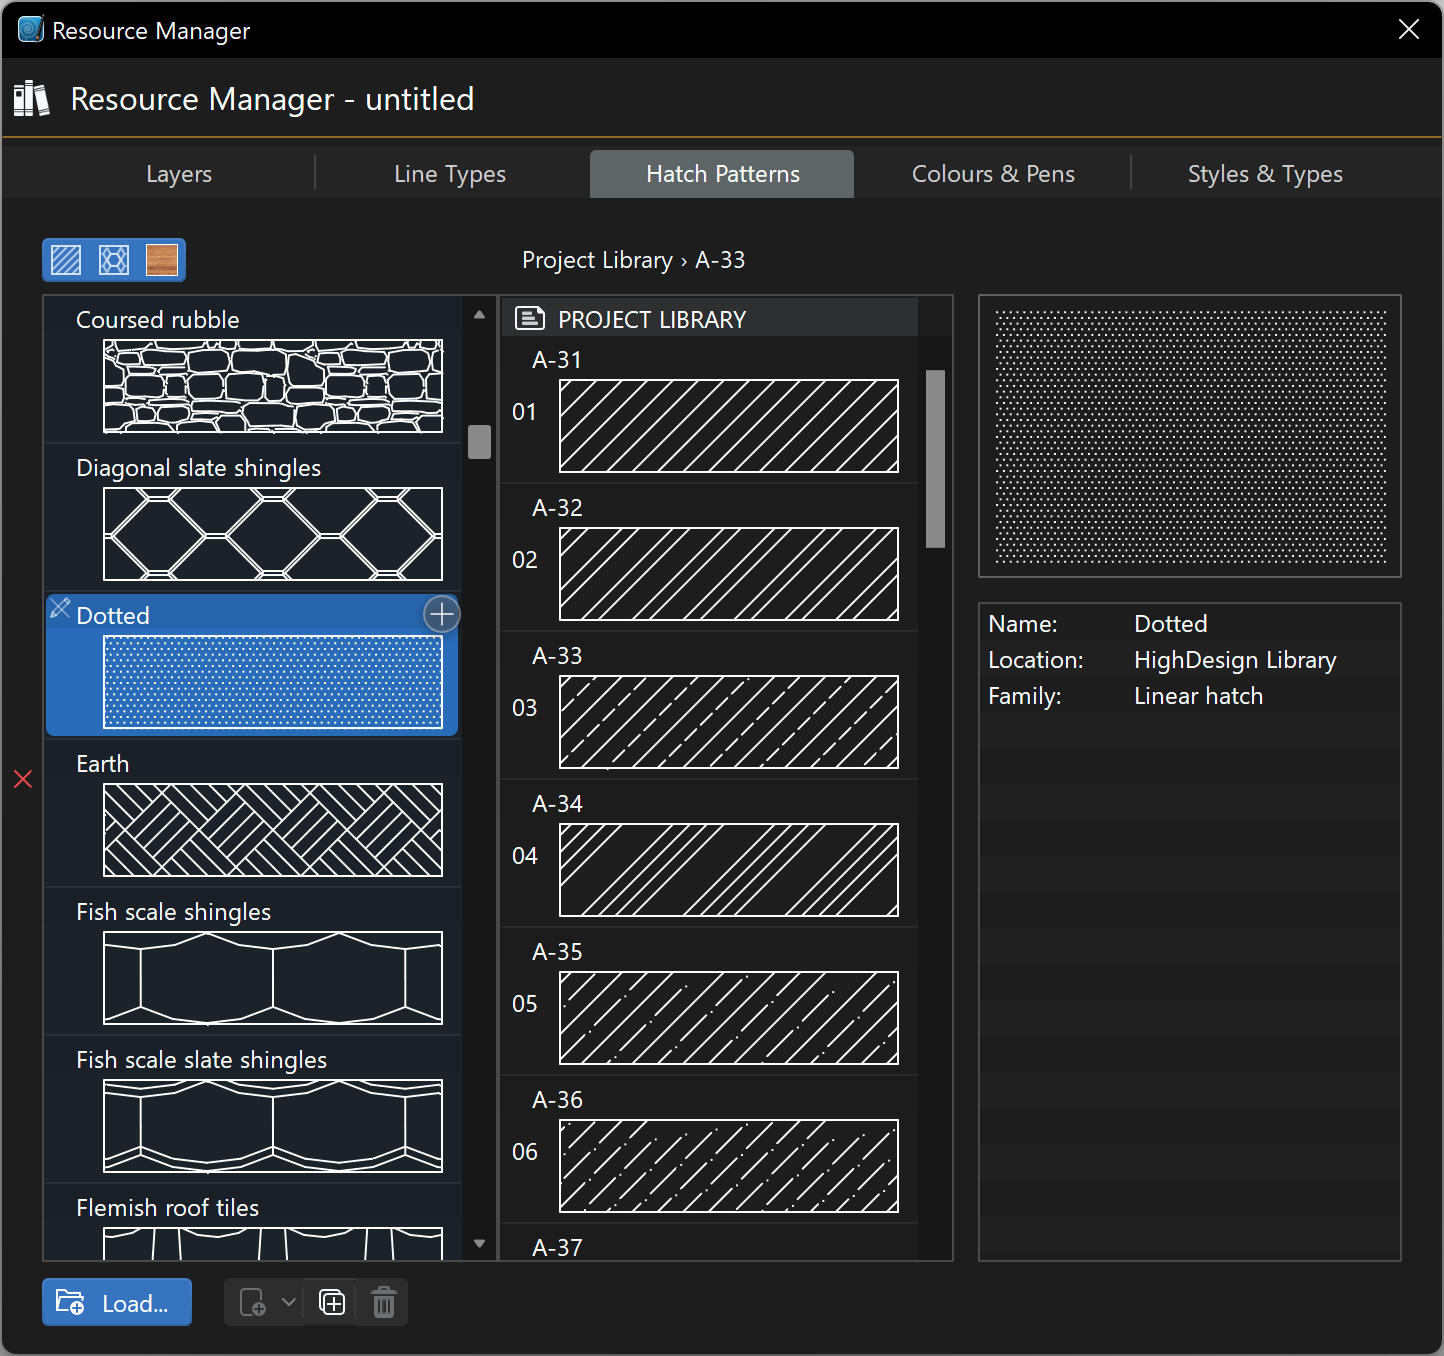
Hatches, Patterns and Textures
This pane lists the hatch patterns of the project and it is used to create, edit and organize vector hatch patterns. The functions provided by this pane work mostly in the same way as those on the Line Types pane.
HighDesign provides three families of hatch fills:
- Linear hatches, made of parallel lines, continuous or with a specific dash pattern, with variable offsets and angle. A set of line type, angle, and offsets is a skin. A linear hatch can have up to eight overlaid skins.
- Tiled patterns. A pattern is a vector drawing that is tiled (repeated) along rows and columns. Each tile contains the drawing that is clipped inside the hatched region.
- Textures: an image tiled inside the hatched region.

Inspecting a hatch type
Select an item in the Project library to see its preview and inspect its values. Depending on the selected item’s location, it can be edited or deleted if it is a custom item, or duplicated.
Use the icon buttons above the Project list to filter the listed items by family.
The list order of project hatch types can be rearranged by dragging a hatch type to its new position.
Loading a resource from a library
Press the Load button or click the + button to the left of the Project list to reveal the libraries. Select the item to load and push the plus button or drag the item to the Project list. The item is loaded into the project and immediately available for use.
Duplicating a hatch type
You can duplicate any hatch type. To duplicate, select a hatch type and either push the Duplicate button on the bottom side of the window or the pop-up duplicate button on the selected selected hatch type’s cell when available.
The duplicated hatch type is automatically opened for editing so you can modify its name and content directly.
Create a new hatch type
Press the New Hatch Type button and choose the desired family from the pop-up menu.

Depending on the family, the interface changes and shows the relevant fields and tools.
New Linear Hatch
A linear hatch is defined by a line repeated multiple times according to several parameters like spacing, angle, offset, etc. A set of parameters is called a “skin”. A linear hatch in HighDesign can have up 8 skin definitions that are rendered in sequence.
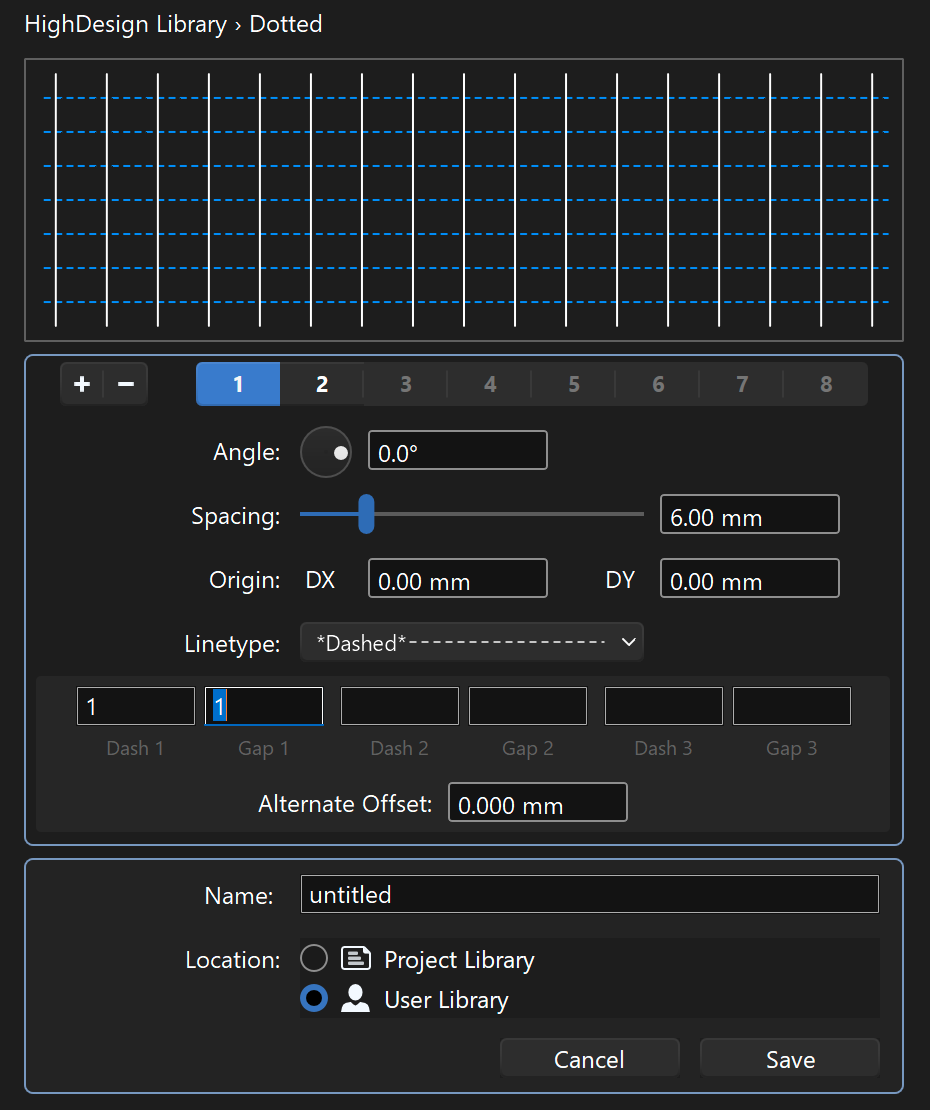
A skin has the following parameters:
- Angle: in degrees, defines the orientation on the plane of the vector.
- Spacing: the distance between two lines, in the current units.
- Origin Dx, Dy: these values control the offset of the current skin from the origin of the hatch. All the spacings are calculated from the origin point of the hatch, which allows you to align the pattern to your design. By entering an X and Y offset the entire skin is moved off from the origin by those values. This is particularly relevant when the hatch is made of multiple skins.
- Line-type: can be continuous, custom dashed or one of the project line types.
- Custom dashed line types can have up to three dash-gap pairs. The values are expressed in the current unit.
- Custom dashed lines can have an alternate offset: the origin of every second line will be moved by the alternate offset value. For example, this is useful to create masonry patterns where the vertical lines are dashed lines with an alternate offset.
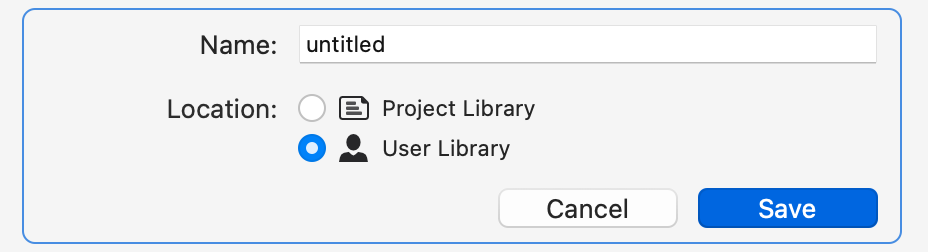
The second section allows you to enter a name for the new resource and select its location.
- Name: enter a name for the new resource. If the chosen name conflicts with another resource in the same location, you will be asked to review the name entered.
- Location: select the destination library of the new resource.
New Tiled Pattern
When you select New Tiled Pattern from the new hatch menu, the workspace switches from “Project” to “Edit Pattern”. This workspace allows you to design the typic tile of the hatch pattern using a sub-set of the drafting tools and to define its size. The Edit Pattern panel provides a preview of what the tile will look like when rendered as a pattern and allows you to define the tile’s width and height.
In this workspace the drawing scale is set as 1:1. The available drawing tools are Selection Arrow, Construction Objects, Lines, Segmented Lines, Rectangles and Regular Polygons. The drawing area is set by the size of the tile.
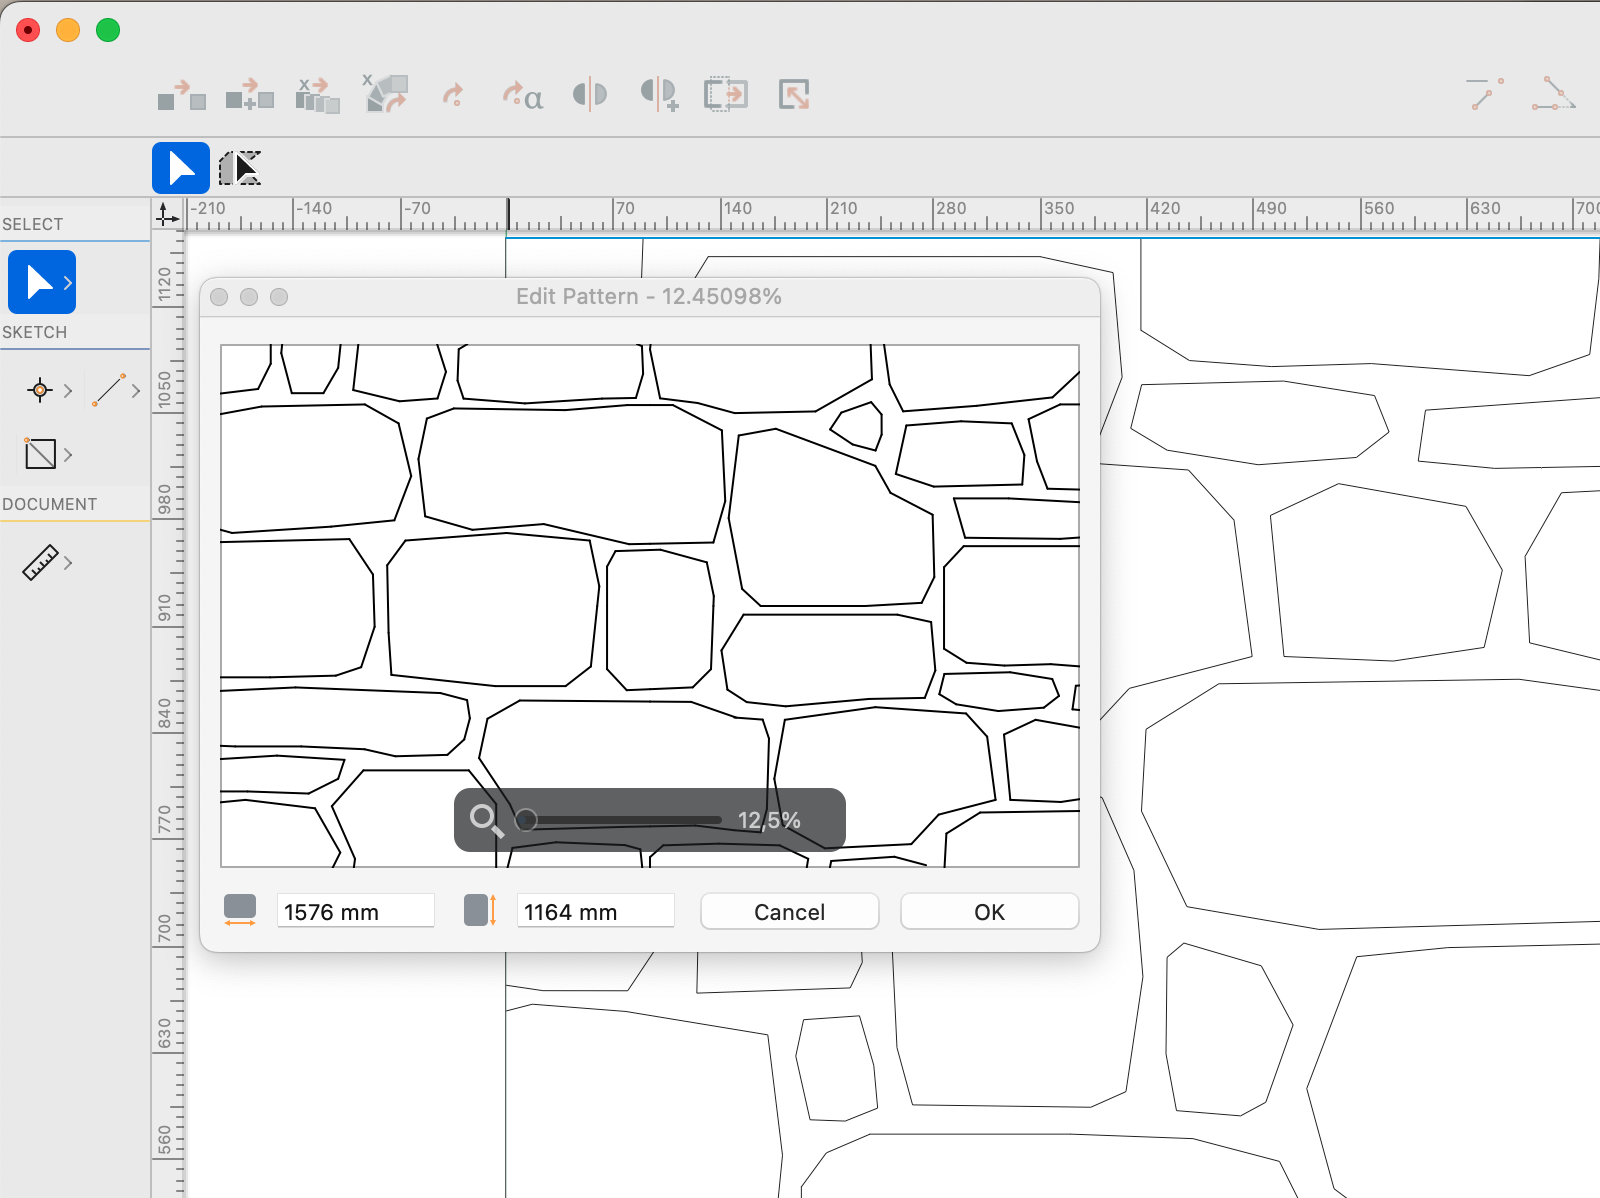
You can also Copy/Paste drawings from the main window of HighDesign: in this case it is advisable to set the size of the tile before pasting the pattern since tile, drawing area and pattern must have the same size.
In the drawing area you can draw and edit the pattern exactly as in the main window. When the pointer is close to the middle of the tile, the median axes become visible to provide a visual aid to mirror or rotate objects. Other alignment points are available on the borders of the tile to make it easier to design the tile and avoid gaps.
The preview window provides the fields to set the size of the tile and the zoom slider: once the drawing is complete, just push the “OK” button in the preview window and the focus turns back to the Hatch Manager.
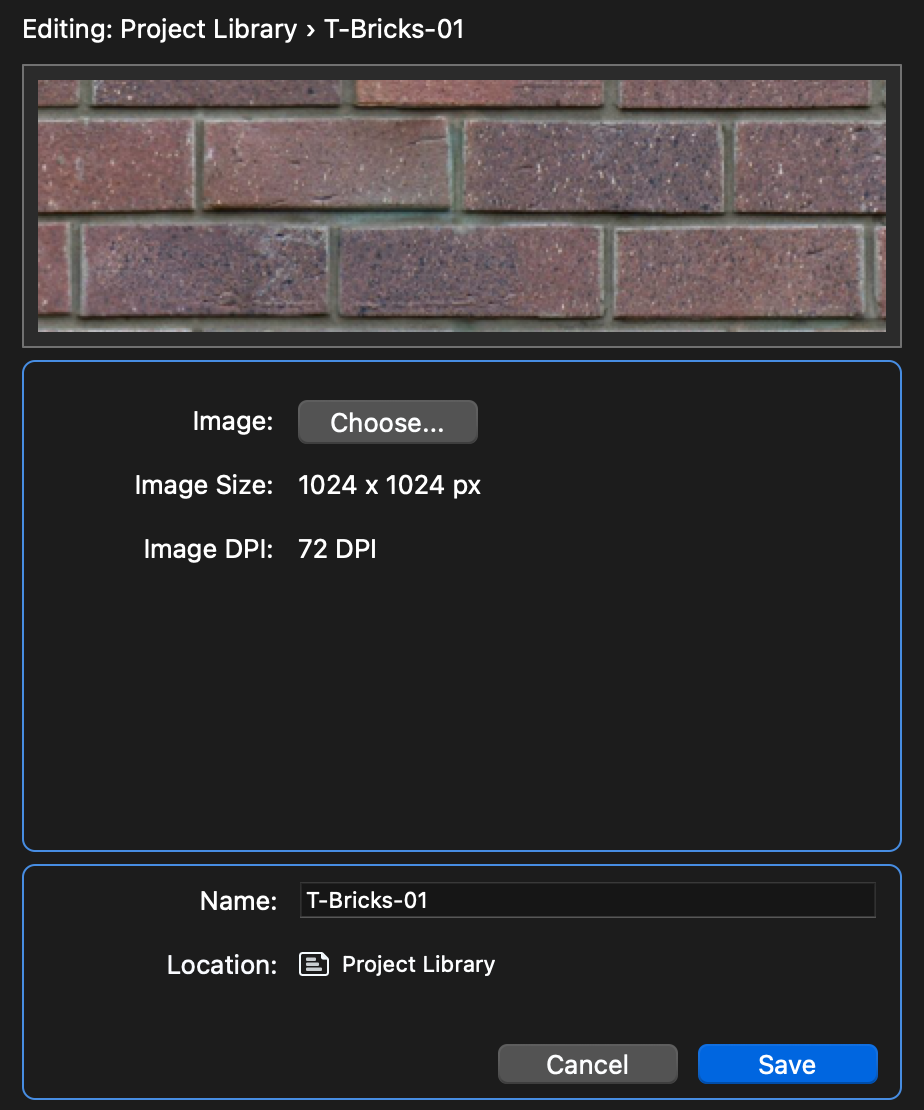
New Texture
Another family of hatch is the texture, which tiles and repeats an image inside the boundary area. To create a new texture, click the Add (+) button, select New Texture and choose the image in any of the supported file types.
A texture only supports 90° rotations, and can be scaled via the Hatch Properties panel. The origin of the texture can changed just as in linear hatches and patterns, by moving the center point when the hatch object is selected in the drawing.
Edit a hatch type
Custom and project hatch types can be edited by pushing the Edit button on the selected item’s cell. It is possible to change any of the parameter values and the name, but not its location.
Delete a hatch type
- Select a custom type; note that only custom hatch types can be deleted;
- Push the “Delete” button.
Colors and Pen Associations
Drawing items in HighDesign by default have an indexed color from a Standard palette of 256 colors. The Colors pane on the left lists the default palette and provides the options to activate or create new palettes and add them as resources to the project.
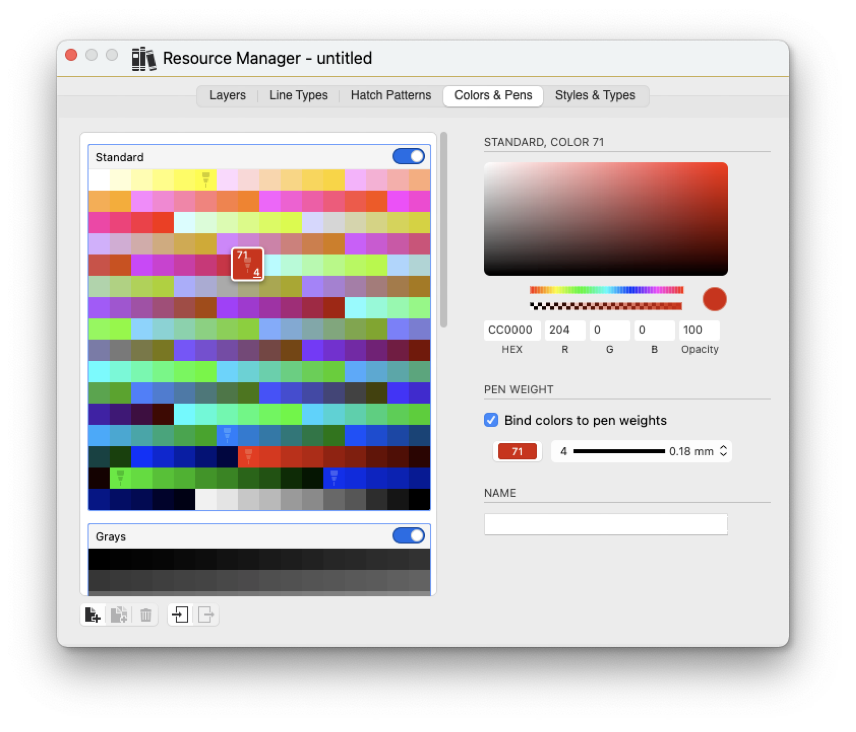
Click the Switch buttons to add other default palettes (Grays, AutoCAD® ACI, ISO/DIN) to the project. The buttons on the bottom of the palette list are:
- Add Palette, to create a new custom palette; use the “+” and “-” buttons to add or remove colors to set through the color picker. Click the green check mark to confirm; new palettes are automatically saved in the User Library.
- Duplicate the selected palette.
- Delete the selected custom palette.
- Import external palettes through the .xml and .ase file formats.
- Export a palette as a resource available for external use. Use the controls and the info displayed on the right side of the panel to check the values of the chosen colors or to set the new colors of the custom palette through the color slider and picker. Analytically set the color values via the HEX or RGB fields. The opacity slider and field control the Opacity value of the color. Use the Name field to set the color name.

Use the controls and the info displayed on the right side of the panel to check the values of the chosen colors or to set the new colors of the custom palette through the color slider and picker. Analytically set the color values via the HEX or RGB fields. The opacity slider and field control the Opacity value of the color. Use the Name field to set the color name.
Binding Colors to Pen Weights
Bind a color to a pen weight, so that choosing a pen color in the project automatically sets the associated pen weight.
- Activate the “Bind colors to pen weight” option, click a color and choose a pen weight from the pop-up menu; the selected pen number appears on the color box. To remove a pen from a color, press the Option key on the keyboard and click the color box or choose “None” from the pop-up menu.
- The color-pen binding works in one direction only: selecting a color also selects its pen weight, but selecting a pen weight does not change the current color. This allows you to change the pen weight of an object at any time without affecting its pen color. Color-pen bindings are saved in the current document.
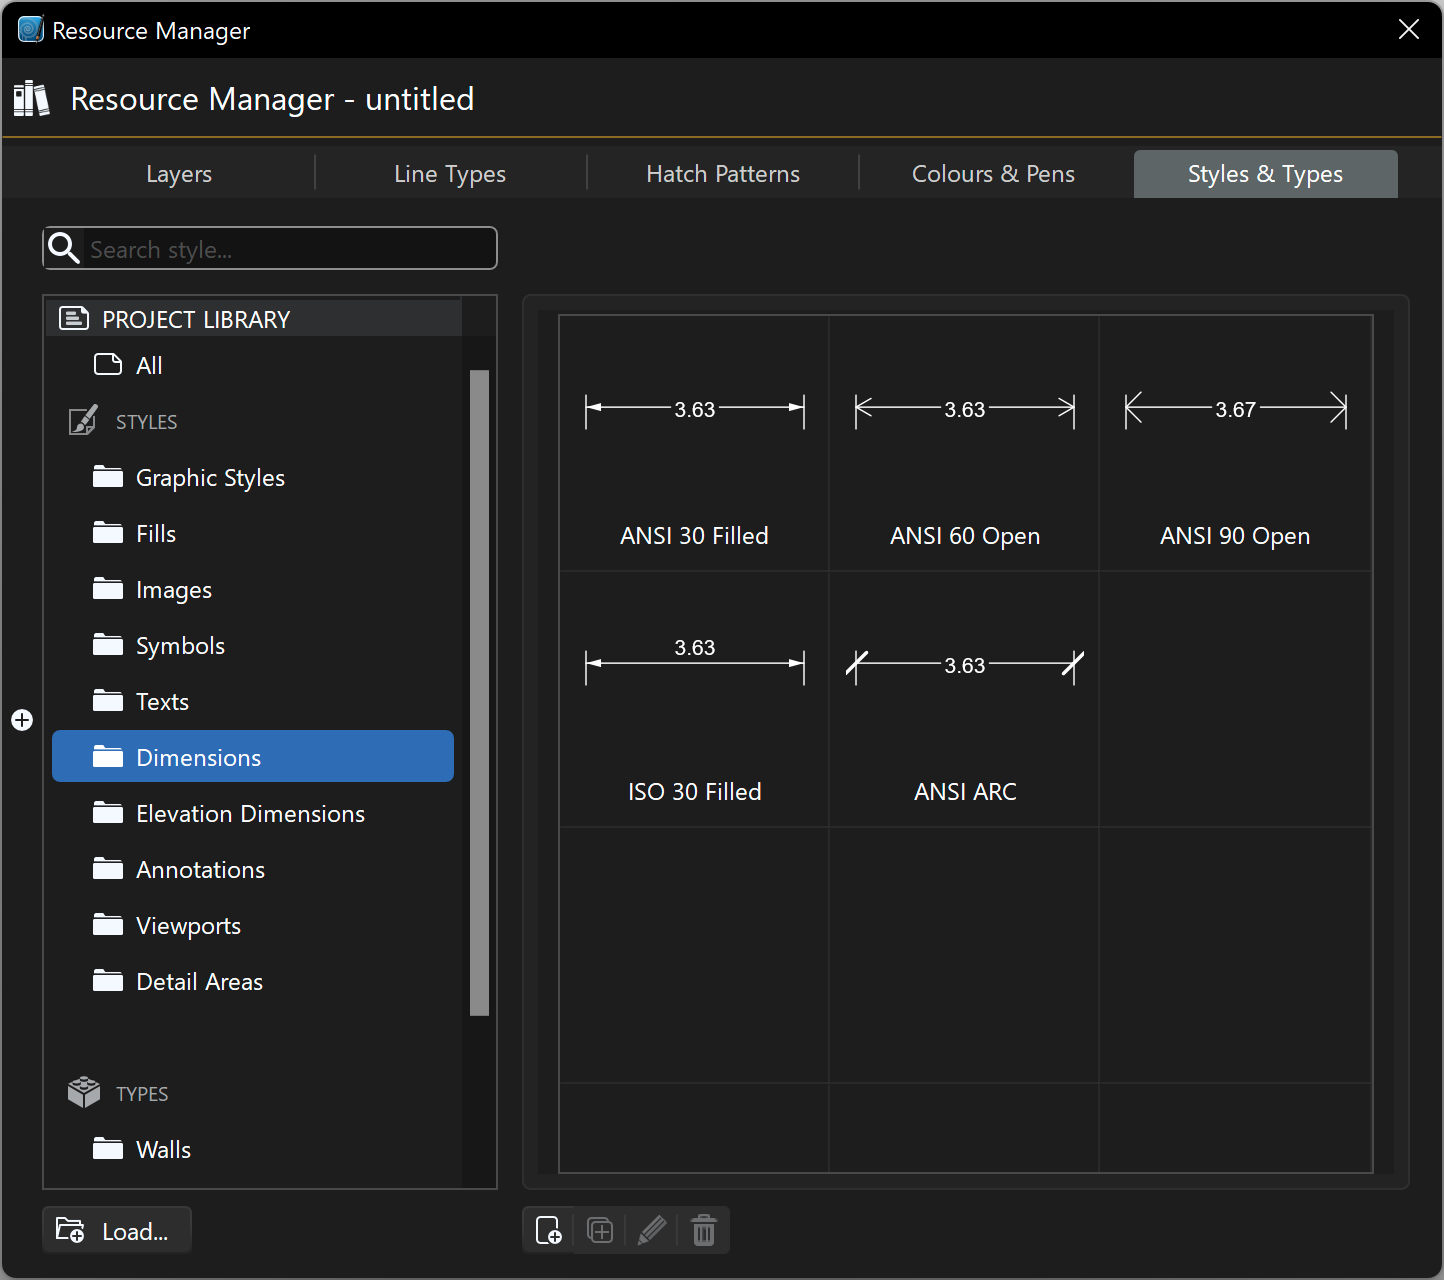
Styles and Types Manager (Pro)
The Styles & Types manager pane lets you add pre-defined styles and types to your project, create new items and manage the libraries. The underlying method of operation is the same as the other resource panels, the main difference being that styles and types are organized by class in sub-folders. For more information on styles and building types, see the chapter Styles and Types.
Select a folder to view its items on the preview table, or select All to view all the styles and types loaded in the current project. You can also search a particular style by entering its name in the search field.
Loading a resource from a library
Press the Load button or click the + button to the left of the Project list to reveal the libraries. Select the item to load on the preview table and push the pop-up Add button on the item’s cell. The item is loaded into the project and immediately available for use.
Duplicating a style/type
You can duplicate any style or type. To duplicate, select the item on the preview table and press the Duplicate button, visible below the table. The item is duplicated and opened for further editing.
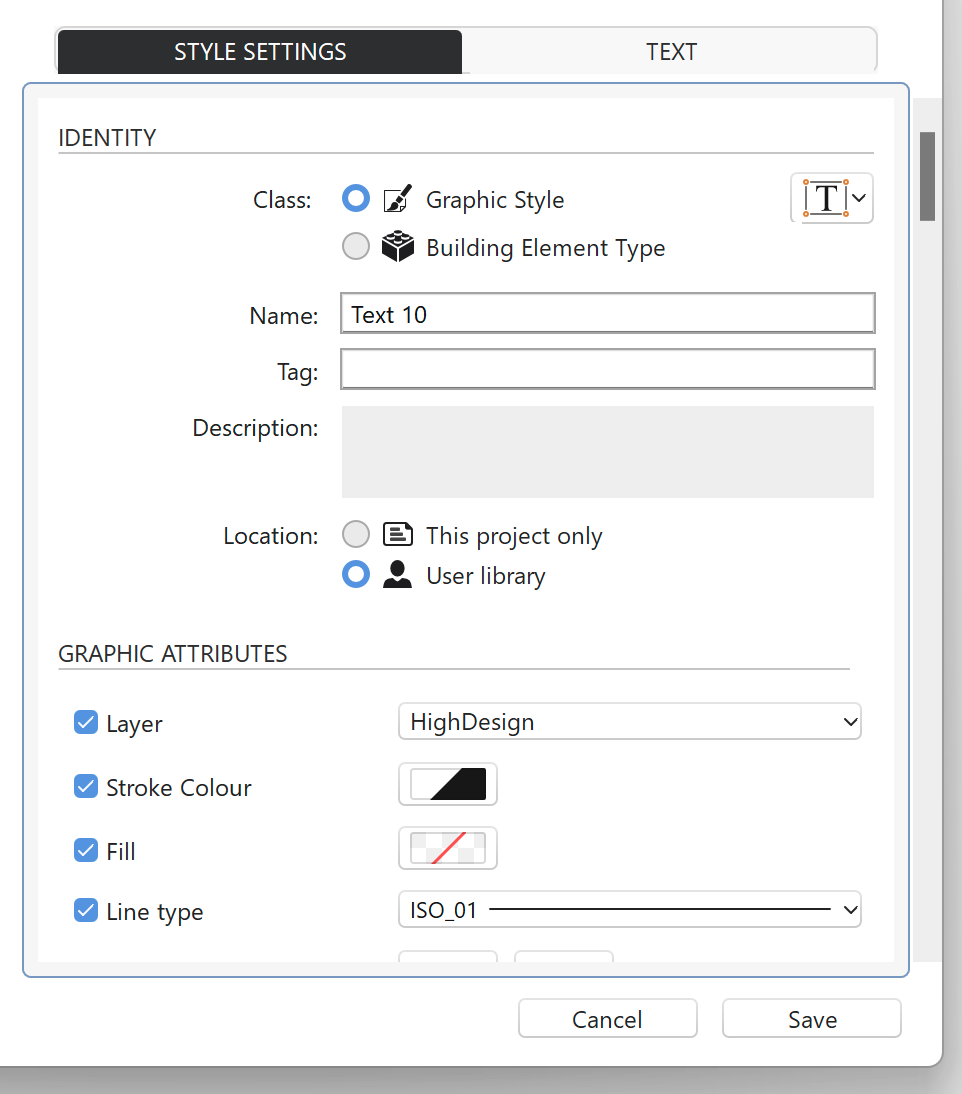
Create a new style/type
Press the New Style/Type button to create a new item. The right half of the window shows the panes where you can define the style. The number of tabs is variable and depends on the family of the style, but all styles have at least the Style Settings tab where you can define the common attributes such as class, name, tag, description and the graphic options that the style controls.
Edit a style/type
Custom and project styles and types can be edited by pushing the Edit button on the selected item’s cell. It is possible to change any of the parameter values and the name, but not its location.
Delete a style/type
- Select a custom type; note that only items in the project and user libraries can be deleted;
- Push the “Delete” button.